- Install Analytics Data Sync Adapter
- Install Flume and Service Monitor from the RPM
- Configure Vocera Platform 6.0 Remote Agent and Source
Installing Analytics Data Sync Adapter
You must install Analytics Data Sync Adapter to get full dimension data as well as incremental dimension data.
Prerequisites:- Have access to RPM in Artifactory requires a repository (repo) configuration in /etc/yum.repos.d/vocera.repo.
To install Vocera Analytics Data Sync Adapter, perform the following steps:
- Configure the repo with the artifactory path.
The following is an example Artifactory configuration in /etc/yum.repos.d/vocera.repo:
[Artifactory]
name=Artifactory
baseurl=http://<artifactory path>/Platform-6.0
enabled=1
gpgcheck=0
Note: The specific Artifactory repo is listed at the end of the URL.In this example, the baseurl is the path of the Artifactory repo.
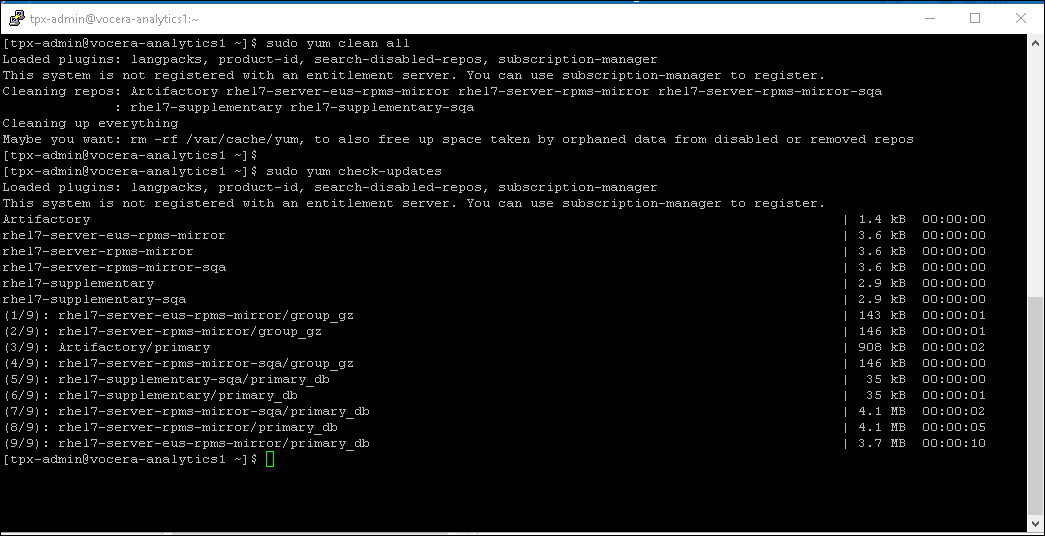
- Execute the following command to clean all cached
information
sudo yum clean all
- Execute the following command to check for the latest
RPM
sudo yum check-updates
- Search for the required RPM name by executing the
command
sudo yum search vocera-analytics
where vocera-analytics-data-sync-service is the RPM name.
- To install, execute the
command
sudo yum install vocera-analytics-data-sync-service.x86_64
where vocera-analytics-data-sync-service.x86_64 is the RPM name.After you execute the command, the system displays the package details and prompts for a confirmation to install.
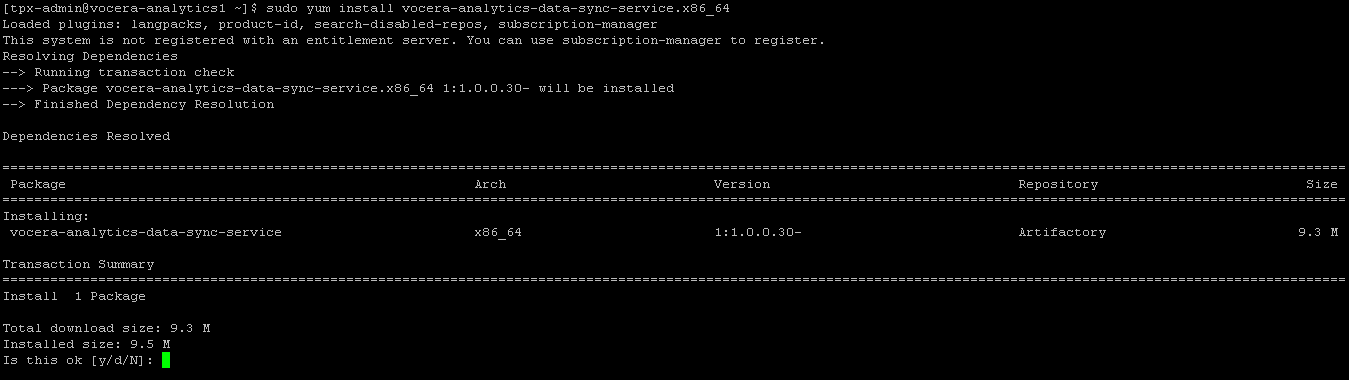
- Press y to install.

The system installs the Analytics Data Sync Adapter and displays Complete! upon installation.
To verify if the Analytics Data Sync Adapter is installed successfully:
- Login to Vocera Platform 6.0 Web console.
- Go to Status > Adapter Services
and check the list of adapter services displayed.
The AnalyticsDataSync service should be listed in the list of available services and display its status as ACTIVE.
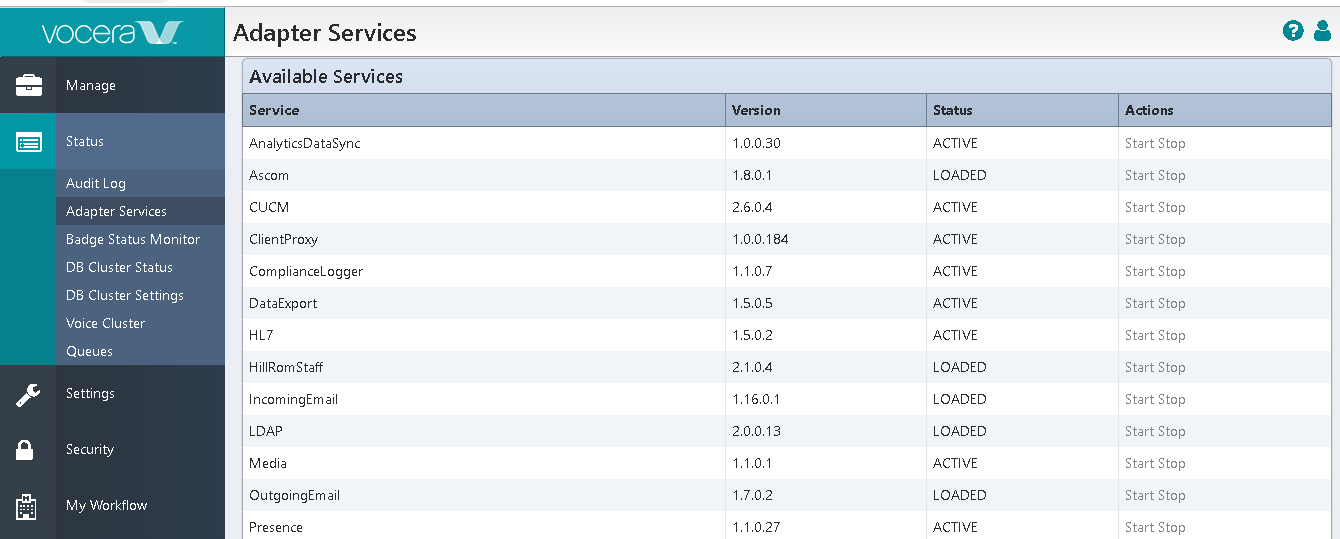
- Verify that the version displayed in the Adapter Services screen is the same that you have installed.
Installing Flume Agent and Service Monitor from the RPM
Prerequisites:- Have access to RPM in Artifactory requires a repository (repo) configuration in /etc/yum.repos.d/vocera.repo.
To install the Flume Agent and Service Monitor on the Vocera Platform 6.0 system, perform the following steps:
- Configure the repo with the artifactory path.
The following is an example Artifactory configuration in /etc/yum.repos.d/vocera.repo:
[Artifactory]
name=Artifactory
baseurl=http://<artifactory path>/Platform-6.0
enabled=1
gpgcheck=0
Note: The specific Artifactory repo is listed at the end of the URL.In this example, the baseurl is the path of the Artifactory repo.
Note: Access to RPM in Artifactory requires a repository (repo) configuration in /etc/yum.repos.d/vocera.repo. - Execute the following command to clean all cached
information
sudo yum clean all
- Execute the following command to check for the latest
RPM
sudo yum check-updates
- Search for the required RPM name by executing the
command
sudo yum search va-flume.x86_64
where va-flume is the RPM name.
- To install, execute the
command
sudo yum install va-flume.x86_64
where va-flume.x86_64 is the RPM name.Installing flume agent also installs the monitoring service.
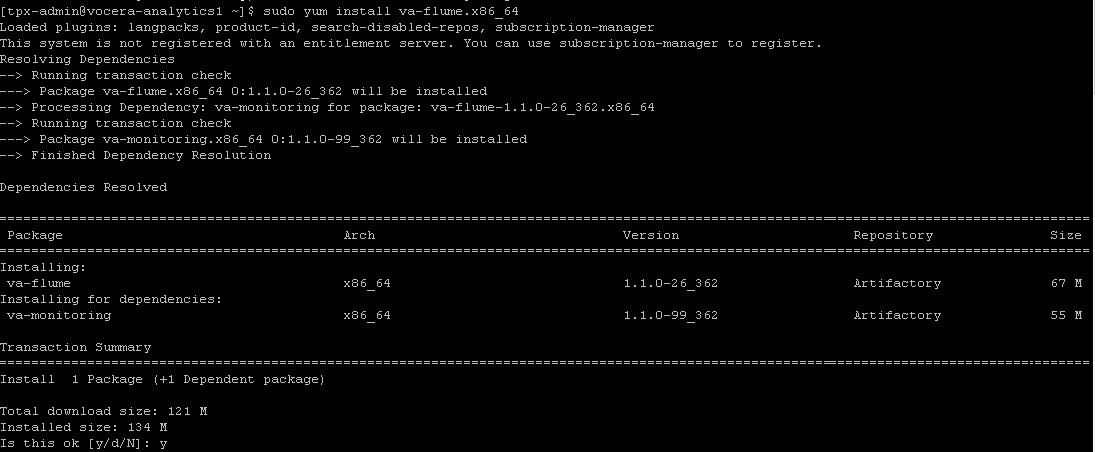
After you execute the command, the system displays the package details and prompts for a confirmation to install.
- Press y to install.
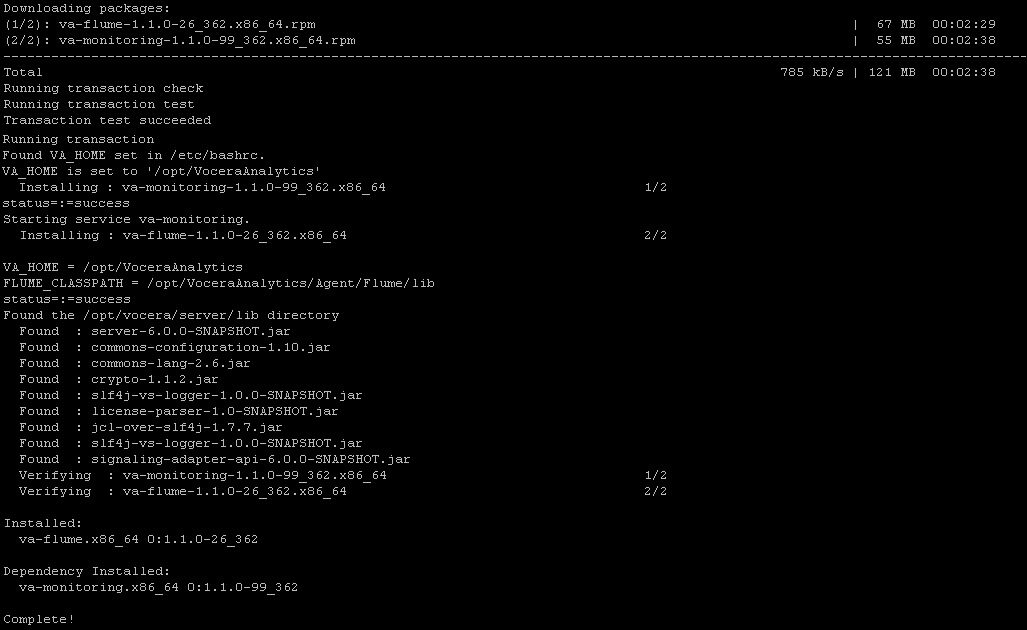
The system installs the flume package and displays Complete! upon installation.
Note: The flume package installs both flume and service monitor.After the installation is complete, the service monitor starts automatically.
To verify if the service monitor is installed successfully, perform the following step:
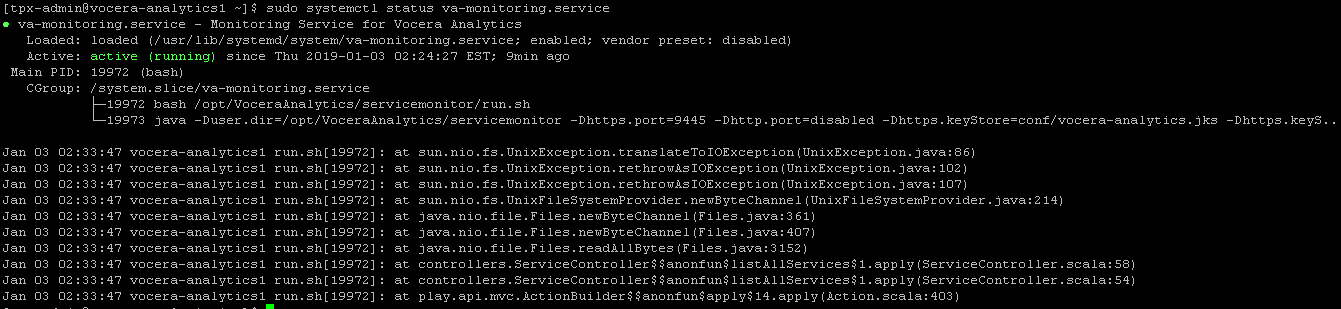
- To verify the status of the service monitor, execute the
command
sudo systemctl status va-monitoring.service
The output should display the va-monitoring-service as active (running).
Configuring Vocera Platform 6.0 Remote Agent and Source
Configuration
To configure Vocera Platform 6.0 Remote Agent and Source, perform the following steps on the Vocera Analytics system:
- Double-click the ServiceMonitor Dashboard icon on your desktop or enter the following in the address bar of the browser window: https://<host_name>:9445 where host_name is either the numeric IP address or the DNS name of the Service Monitor.
- Login to the Service Monitor application of Vocera Analytics.
- Go to Configuration > Remote
Agents and add a remote agent for Vocera Platform 6.0.Note: Only the fields required for this configuration are explained. For more information, refer to Configuring Remote Agents.
Configure the Remote Agent name and its hostname.
In the following figure, Remote Agent 1 is the name of the remote agent, 172.30.164.55 is the hostname. The hostname is the IP address or machine name of Vocera Platform 6.0.
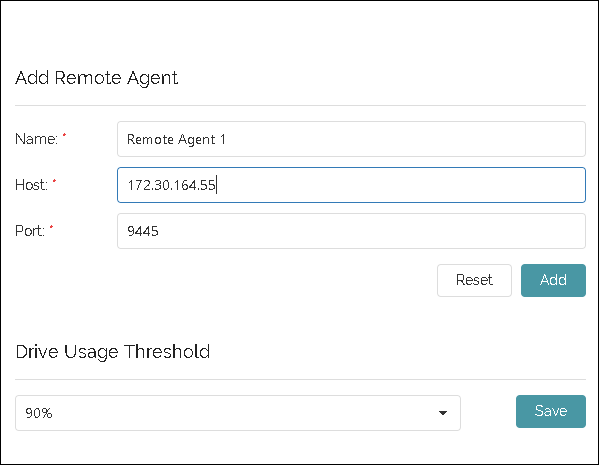
- Click Add to add a remote agent of Vocera Platform
6.0.
A pop-up message appears that the remote agent is added successfully.
- Go to Configuration > Sources page
and add a source for Vocera Platform 6.0. Note: Only the fields required for this configuration are explained. For more information, refer to Configuring Sources.
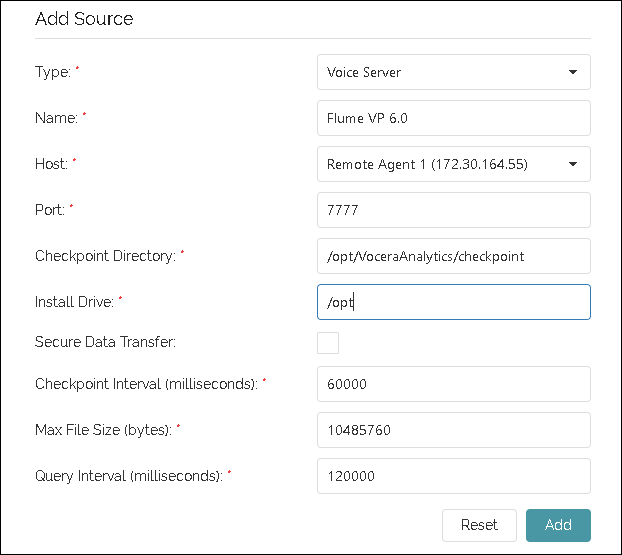
- In the host field, select the remote agent that you configured in the previous task.
- Specify the checkpoint directory location where you have access to create a
directory.
The checkpoint directory is created while configuring sources. In this example, the checkpoint directory is /opt/VoceraAnalytics/checkpoint.
- Specify the directory location where Vocera Platform 6.0 is installed.
In this example, /opt is the directory where Vocera Platform 6.0 is installed. /opt is the default directory location.
- Click Add to add the source of Vocera Platform 6.0.
A pop-up message appears that the source is added successfully.
- Go to Configuration > Pipeline
page and add a pipeline for Vocera Platform 6.0.
Note: Only the fields required for this configuration are explained. For more information, refer to Configuring Pipeline.
- In Voice Server Version field, select 6.0 from the
dropdown list.
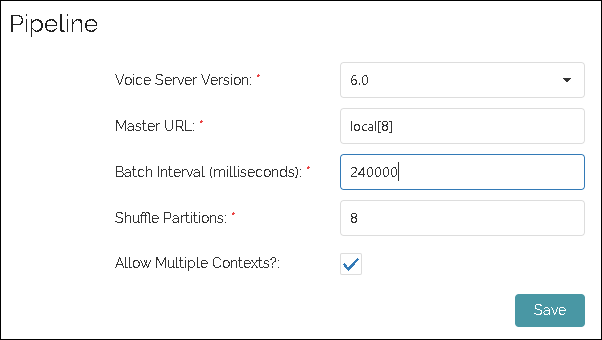
- Click Save to save the pipeline configuration for Vocera Platform
6.0.
The pipeline is successfully saved.
- Update the maximum heap memory size (Xmx512m) of flume to the required
value based on the customer deployment
size.
The flume heap memory size is available in the flume-env.sh
file located at
<Install_Drive>\VoceraAnalytics\Agent\Flume\conf.
For more information on customer deployment sizes, refer to Customer Deployment Sizing. Based on the
applicable customer deployment size,
replace
export $JAVA_OPTS="-Xms256m -Xmx512m -Dcom.sun.management.jmxremote"
with
Customer Deployment Size Flume Heap Memory Size Small export $JAVA_OPTS="-Xms256m -Xmx1024m -Dcom.sun.management.jmxremote"
Medium export $JAVA_OPTS="-Xms256m -Xmx2048m -Dcom.sun.management.jmxremote"
Large export $JAVA_OPTS="-Xms256m -Xmx4096m -Dcom.sun.management.jmxremote"
Note: Ensure that you stop the flume service, update the heap memory size, and restart the flume service if flume is already running.The following example shows the updated maximum flume heap memory size for small deployments.

Proceed with configuring the remaining services. For more information, refer to Monitoring Services.
Verification:To verify if the checkpoint directory is created in the configured location:
- Login to the Vocera Platform 6.0 server.
- Go to /opt/VoceraAnalytics.
The checkpoint directory created is displayed.
