You can add a user to the list of Vocera Platform Web Console users.
Before you begin, review the recommended best practices.
-
Navigate to Users in the Manage
section, and click Add New.
The New User page displays.
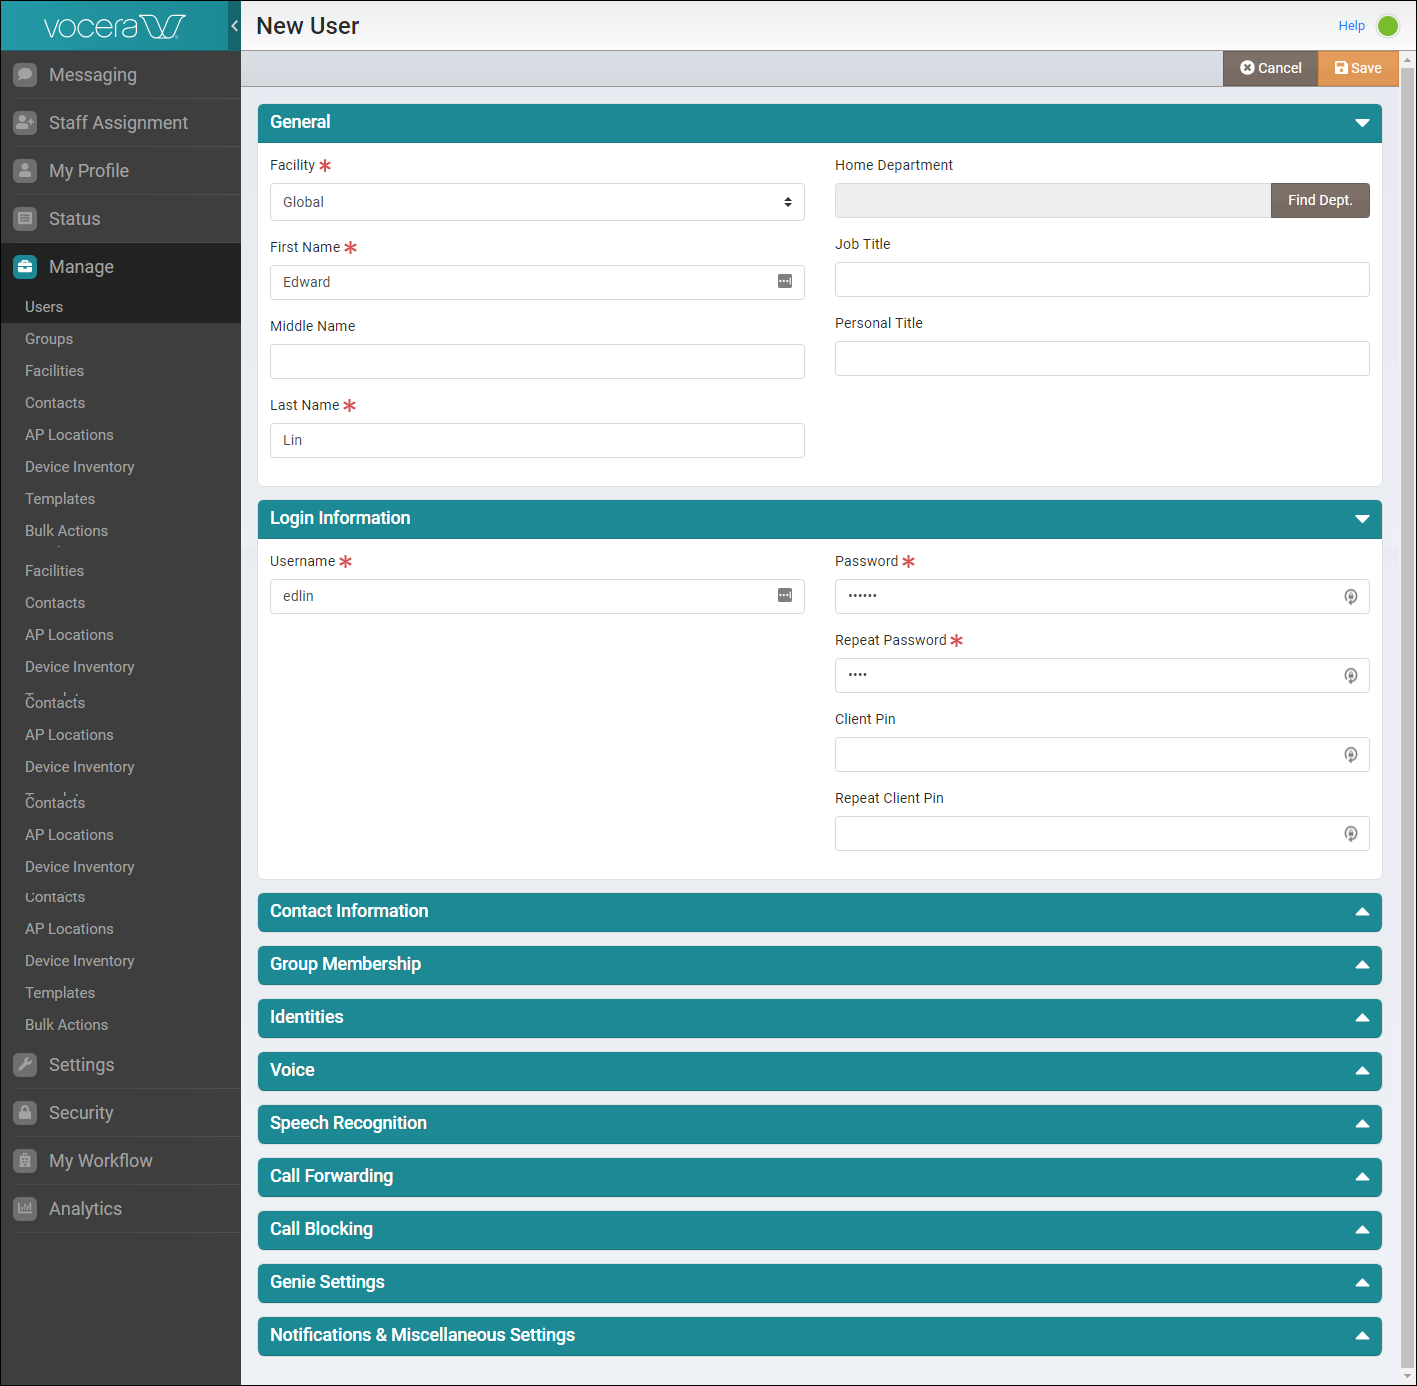 The New User page includes the following sections:
- General
- Custom
- Login Information
- Contact Information
- Group Membership
- Identities
- Voice
- Speech Recognition
- Call Forwarding
- Call Blocking
- Genie Settings
- Notifications & Miscellaneous Settings
Tip: You can click the drop down arrow at the right hand side of each section to expand or collapse these sections. -
In the General section, complete the fields listed in the table below. An asterisk
* indicates that a value must be entered for this field.
Attention: Vocera recommends that you avoid creating generic user profiles such as," Charge Nurse", "Manager on Call", or "Temp Nurse One" etc. The generic user profiles interfere with basic device usage and unintentionally cause user confusion. Instead, set up roles as groups, use first and last names to configure user profiles, and then assign users to a role by adding them to the appropriate group. Individual device users then have access to all Vocera features, and callers can find them by using either their names or roles.
Field Maximum Length Description Facility *
50
Select the facility associated with your user from the drop down list. If you have not defined a facility, or if you do not want to specify a facility for the new user, select the default Global value
If your organization has multiple facilities connected to the same Voice Service, choose the facility that represents the user's physical location.
First Name *
50
Enter the user's first name.
The name must start with a letter or digit. It must contain only letters, digits, spaces, apostrophes ('), underscores (_), or dashes (-). No other characters are allowed.
By default, the speech recognition system uses the names you enter to recognize users. If people refer to a user by something other than the name you enter here, provide an Alternate Spoken Name in the Speech Recognition section.
Middle Name
50
(Optional) Enter the user's middle name.
The middle name must start with a letter or digit. It must contain only letters, digits, spaces, apostrophes ('), underscores (_), or dashes (-). No other characters are allowed.
Last Name *
50
Enter the user's last name.
The last name must start with a letter or digit. It must contain only letters, digits, spaces, apostrophes ('), underscores (_), or dashes (-). No other characters are allowed.
Home Department
100
Click Find Dept. to display the Find a Department dialog box and select a home department for this user. If your organization has multiple facilities connected to the same Voice Service, choose the facility that represents the user's physical location.
Job Title
100
(Optional) Enter a job title for the new user. Provide the full spelling of the title rather than an abbreviation.
For example, enter Professor instead of Prof.
Profile Photo
n/a
Displays your profile photo (if uploaded via your organization's active directory). If no profile picture is displayed, you can upload a new photo.
The default photo size is 100KB. Only jpeg and png filetypes are supported.
You can click the Edit link on the Profile Photo field to select a new photo and upload it as your profile photo. For more information on adding a profile photo, see Adding or Editing a Profile Photo.
Note: You cannot edit or remove your profile photo, if your profile photo was imported via the active directory (LDAP) integration.Notes
1000
(Optional) Enter notes with information about the user account. System administrators can use this information to record important notes about the user's account. This may be useful when a new person is assigned the system administrator role and wants to learn more about the user account details.
The maximum character length for the Notes field is limited to 1000 characters.
-
In the Custom section, define custom attributes that you would like to integrate
with an external system. Complete the following field information:
- Custom 1 — Custom field to enter up to 100 characters to define a custom attribute for user profiles.You may need this information to facilitate integrations with external data sources. For example, you might need to include an external system identifier such as those used in Electronic Health Record (EHR) and Nurse Call systems.
- Custom 2 — Additional custom field to enter up to 100 characters to define an additional custom attribute for user profiles. You may need this information to facilitate integrations with external data sources. For example, you might need to include an external system identifier such as those used in Electronic Health Record (EHR) and Nurse Call systems.
Attention: The Custom section and fields are not included by default in the User configuration. System administrators can configure the custom section and fields for users, devices, and groups in the system. For information on configuring Custom section, see Creating Custom Options for Users. -
In the Login Information section, complete the fields listed in the table below.
All fields must be provided.
Field Maximum Length Description Account Enabled *
N/A
This field is visible only when editing a user; when you initially create a user, the field does not appear and the account is enabled by default.
Disabling an account is useful in situations where a user is temporarily not available. When the account is disabled, the user's name and alternate spoken names are removed from the system grammar, improving speech recognition; in addition, disabled users do not decrement your overall user count for licensing purposes.
Username *
50
Enter the username that the new user will use to log in to My Profile.
Minimum length for username is 4 characters and maximum is 50 characters. You can only use letters, digits, underscores (_), or dashes (-) in your username. No other characters are allowed.
Password *
64
Specify a password for the user's My Profile login credentials.
Minimum length for password is 4 characters (as set by the default password policy) and maximum is 64 characters. You can only use letters, digits, common punctuations, and symbols in your password. No other characters are allowed.
Repeat Password *
64
Re-enter the password. Must be identical to the value entered in the Password field.
Client Pin
Varies per PIN policy
Enter a numeric value for Client PIN.
See Understanding the PIN Authentication Security Items for more information on PIN policy.
Repeat Client Pin
Varies per PIN policy
Re-enter the Client PIN number.
Reset Client Pin
Varies per PIN policy
Allows to reset an existing Client Pin and add a new Client Pin
Click Reset Client Pin link to display the Reset Client Pin dialog box.- Specify a client pin in the New Client Pin field.
- Re-enter this pin value in the Repeat Client Pin field.
- Select Reset to proceed with the client pin reset action.
-
In the Contact Information section, optionally complete the fields listed
below.
Field Maximum Length Description Email Address
60
Enter the user's email address to facilitate the following:
Other users can send voice messages from their devices to this user's email inbox. Vocera sends voice messages to an email address as .WAV file attachments. Users can listen to these messages with the Windows Media Player and other players.
.Cell Phone
50
Allows users to forward calls from a device to a cell phone.
If users have appropriate permission and have Vocera Access Anywhere enabled, the Cell Phone field allows users to be authenticated by Caller ID when they call the Vocera hunt group number.
Home Phone
50
Allows users to forward calls from their devices to their home phones. It also allows users to take advantage of the "Call My House" Contacts entry.
Employee ID
50
Specify an employee ID (unique value) that identifies a Vocera user.Note: You must have System Administrator or Tiered Administrator privileges to change or enter the Employee ID.Desk Phone or Extension
50
Enables the following features:
-
Allows users to forward or transfer calls from their Vocera devices to their desk phones.
-
If no Vocera Extension is specified, outside callers can connect to a user's Vocera device by entering the user's desk extension at the Vocera hunt group prompt, instead of saying the user's name.
-
Allows users to send a page and receive the return phone call from a person they paged on their devices.
-
If users have appropriate permission and have Vocera Access Anywhere enabled, the Desk Phone or Extension field allows users to be authenticated by Caller ID when they call the Vocera hunt group number.
Pager
50
Allows users with the proper permissions to receive numeric pages on their pagers from other device users who issue the "Page" voice command.
Cost Center
100
Specify a cost center to which the new user is assigned. A cost center ID lets Vocera track system usage by users and potentially allows an organization to charge for relative usage.
-
-
In the Group Membership section, add the user's group membership information.
- Click Add Group to display the Select Group dialog box.
- Select a group name from the list of groups available in the system.
-
Click Select Groups or Cancel
to close the dialog. .
You can add multiple groups to this user's profile
-
Click Find Group to add groups for
Conference Group this user is a member of
field.
The Conference Group this user is a member of field allows you to add members of a group or groups who's devices are activated when you perform the push and hold function on the device. This feature is useful in situations where you need an immediate communication and voice recognition (Genie) is not involved.
A user can only belong to one conference at a time even if the user is a member of multiple groups.
-
In the Identities section, click Add Identity to associate a
unique alternate identity for a user.
Alternate user identities are system generated and connected to an adapter or a service. Occasionally, system administrators may need to delete or update this field for a user.When you click the Add Identity button, the Add Identity dialog box appears. In the Add Identity dialog box:
- Enter a name in the Name* field.
- Select an Adapter from the Adapter drop down list and click Done.
- Repeat this step to add additional identities for this user.
-
In the Voice section, complete the fields listed below:
Field Maximum Length Description Vocera Phone
50
Allow users to forward calls from their Vocera devices to the specified phone number.
Allows a user to route calls made to this virtual extension to go to their Vocera device instead. If the Vocera Phone field is filled in, it is used for
-
Direct dialing from smartphone keypads
-
Paging callbacks
-
Vocera hunt number access
If you leave this field blank, smartphone users and outside callers can dial the user's desk phone to be routed to the user's Vocera device.
Because the Vocera phone is a virtual phone number, you can put any number in this field. If a user already has a desk phone number, you can reuse that number for the Vocera Phone field but prepend a digit, such as 8, to make the number unique in the Vocera system. Vocera Phone field values are not constrained by fixed-length numbers for your PBX. You can also enter DID numbers for Vocera phone.
Dynamic Extension
50
As Vocera assigns dynamic extensions, they appear in this read-only field. Because dynamic extensions are assigned on-demand, this field may be empty even after you enable the dynamic extensions feature. Similarly, this field will continue to display an expired number that has not been reassigned; the user keeps the number as long as it is available.
PIN for Long Distance Calls 50
Allows an organization to authorize or account for telephone usage and to distribute telephone costs among different users, departments, or facilities.
A PIN template can include digits, special characters, and PIN macros.
Device ID
12
Enter the MAC address of the device. This is available on the device's Info menu. The MAC address of a device is also printed near the bottom of the white label under the battery.
For Vocera devices, this field is automatically populated when you enter a valid value in the Serial Number field; the last 6 digits of the serial number and the MAC address are identical. For Vocera Smartphones, remove the battery door and then the battery, and then enter the MAC address and serial number listed on the back of the phone.Enable Access Anywhere
n/a
Important: Unless you have enough Vocera Access Anywhere licenses for all of your users, Vocera recommends that you leave this default setting cleared.
When selected, the Enable Access Anywhere option enables the users to access the Genie from a standard telephone to perform Vocera functions other than basic calling. For example, you can phone the Vocera Direct Access number, and say a command to the Genie to broadcast a message to a group or play your messages.
If you check this box, make sure you enter a password in the Phone Password field for all users that are not authenticated by Caller ID when they access the Genie from a phone. Also, re-enter the password in the Repeat Phone Password field.
The number of users that can use the Vocera Access Anywhere feature is controlled by your Vocera license. If you don't have the license, Vocera Access Anywhere is not supported. Even with the proper license, only users that have explicitly been enabled to use the Vocera Access Anywhere feature can take advantage of it.
Phone Password 25
Password used to authenticate the user when accessing the Vocera Genie from a phone.
The Phone Password must be five to 25 characters consisting of letters or numbers. Special characters are not allowed.
Repeat Phone Password 25
Re-enter the password that you entered in the Phone Password field.
-
-
In the Speech Recognition section, optionally enter the following fields.
By default, it is assumed that users will be called by their first and last names. Enter Alternate Spoken Names only if:
- People call the user by different names (such as "Bill Smith" in addition to "William Smith")
- The user's name is pronounced differently from the way that it is spelled. In this case, add one or more phonetic spellings.
Field Maximum Length Description Doctor Prefix
n/a
Select the Doctor Prefix check box to indicate the user is a Doctor. If you are using this option, you do not need to enter Doctor prefix as a value for one of the Alternate Spoken Name (ASN) fields.
For example, if you selected Doctor Prefix field for a user named, "John Smith," you can use a voice command, "Call Dr Smith" on your device. Vocera speech recognition will quickly recognize this voice command and call the user named John Smith.
Enable Frequently Called User
n/a
Enables or disables this user to be included in the weighting for improving speech recognition for frequently called users and departments.
Attention: This option is used in conjunction with the system-level configuration for frequently called users. You can select this option only when you have selected the Preferences > Favor Frequently Called > Users field in the System Configuration section. By default, Favor Frequently Called option is disabled for users and departments.Alternate Spoken Name #1
50
Enter an alternate spoken name. Use these guidelines to ensure the best result when you are defining alternate names for users:- Person, Group, and Location Names — If users refer to
a person, group, or location in various ways, enter each
variation in a different field.
For example, enter Bob Jones and Rob Jones in addition to Robert Jones. Similarly, enter a nickname that the person or place is known by, such as Skip Jones.
- Digits in Name Fields— The names you provide must
start with a letter or digit. They must contain only letters,
digits, spaces, apostrophes ('), underscores (_), or dashes
(-). No other characters are allowed.Note: Even though these special characters are allowed, it is unlikely that an alternate spoken name would need underscores (_), or dashes (-).
- Staff IDs — It is recommended that you do not create
an alternate spoken name that contains numeric digits only.
For example, a staff ID with numbers and no
letters.
567748
Entering numeric staff IDs are permitted. However, using numeric values only might result in- Slower Genie response times
- Problems with phone number recognition
- Acronyms and Initials in Alternate Spoken Names— If
people use an acronym or initials to refer to a contacts
entry, provide them as a series of letters separated by
spaces.
For example, if users refer to Easton Medical Clinic as EMC, enter E M C. Similarly, enter A C Hoyle for A.C. Hoyle. For Jasdeep Narindar Singh, also enter J N Singh rather than J.N. Singh.
- Unusual Pronunciation— If a name has an unusual or
confusing pronunciation or silent letters, enter a name that
is spelled as it is pronounced.
For example, if the system does not recognize the name Jodie Dougherty, you could enter Jodie Dockerty.
- Professional Titles in Alternate Spoken Names— If
users refer to a person by his or her title, provide the full
spelling of the title rather than an abbreviation.
For example, enter Father Brown instead of Fr. Brown, or Professor Lindsay instead of Prof. Lindsay.
- Doctor Title in Alternate Spoken Names— When adding
or editing user profiles, you do not need to include the
Doctor title as part of the user's name in the
Alternate Spoken Names (ASN) field on the Speech Recognition
tab. Instead, check the Doctor Prefix check box. When you
speak a command using one of the ASN variations, Vocera
understands the user to whom you are referring.
For example, when you speak, Call Doctor Michael Smith, the Vocera Genie knows that you are referring to Doctor Michael Smith. You could also speak, Call Doctor Smith or Call Doctor Michael and the Genie will find the user because the Doctor Prefix option is checked.
Alternate Spoken Name #2
50
The second alternate spoken name, if needed.
Alternate Spoken Name #3
50
The third alternate spoken name, if needed.
Identifying Phrase
100
Optionally, specify a phrase that distinguishes this user from others with the same first and last names. For example, "Bill Smith in Marketing." and "Bill Smith in Finance"
Speech Pack
n/a Specify a speech pack for the user's locale. You can choose Default or en-US option from the dropdown list.
-
In the Call Forwarding section, select the Enable
Forwarding checkbox to see the forwarding related fields. Optionally,
specify where incoming calls are to be forwarded.
Choose one of the following to specify where incoming calls are forwarded:
- Forward to Company Voice Mail (default)
- Forward to Another User, Group, or Contact
- Forward to Desk Phone
- Forward to Cell Phone
- Forward to Home Phone
- Forward to Another Number
See Forwarding Calls for more information on configuring forwarding options.
Choose a condition to specify when to Forward the calls:- All — When selected, all calls are forwarded without an alert tone or ring on your device.
- Unanswered — When selected, all unanswered calls are forwarded. This is also the system default.
- Offline — When selected, forwarding occurs only when you are not logged in, or are off the network.
-
In the Call Blocking section, specify whether to Allow all calls by
default or Block all calls by default.
You can also add call exceptions to the user's settings. See Adding Call Blocking Exceptions for more information.
-
In the Genie Settings section, configure the Vocera Genie, which is the voice
interface between the user and the Vocera Platform.
When a user presses the Call button on a badge, the Genie
sends a greeting, accepts commands, and, when necessary, prompts the user. When a
call or a message comes to the badge, the Genie notifies the recipient.
Optionally enter the following settings:
Field Description Genie Voice
Click a radio button to choose a persona for Genie voice. You can click the preview icon by a persona name to play a sample. A Genie voice is a set of voice prompts and tones that give the voice interface a distinctive identity. The Genie Voice dynamically changes when you update the localization and speech packs.
Click the icon next to the choice to preview and play a sample voice. This audio preview is disabled when the associated voice information is not available for the selected Genie Voice.
The default Genie Persona varies per locale, and Override User Settings is set to No
Genie Greeting
A device plays the Genie greeting when a user presses the Call button. Click a radio button to choose one of the following settings:- Tone Only
- Speech Only
- Tone and Speech
By default the Speech only option is selected, and Override User Settings is set to No
Call Announcement
In the Call Announcement section, choose a Ring Tone from the list.
Click the icon next to the Ring Tone selector to play a sample.
By default, the selected ring tone is Ring-Tone-01, and Override User Settings is set to No.
Announce caller's name after tone
Select this checkbox if you want the user to hear who is calling. This announcement adds to the time required to connect each call.
By default, the Announce Name of Called Group box is selected, and Override User Settings is set to No.
Announce name of called group
For calls made to a group, if you want the Genie to identify the group that was called and the facility to which this group belongs (if it is different from the caller's facility) to set the context of the call for the recipient, select Announce Name of Called Group. Instead of saying, "[CallerName]. Accept call?" to announce the call, the Genie says, "Call to [GroupName] from [CallerName]. Accept?" This announcement adds to the time required to connect each call.
If the caller and the called group are from different facilities, the Genie says, "Call to [GroupName] at [FacilityName] from [CallerName]. Accept?"
By default, the Announce Name of Called Group box is selected, and Override User Settings is set to No.
-
In the Notifications & Miscellaneous Settings section, specify the
notifications and settings not covered in the other sections.
-
Specify alert tone settings in the Alert Tones
section:
Setting
Description
On/Off Network Alert
On/Off Network Alert plays a tone when the user moves out of the range of the wireless network.
The audible warning is a convenient reminder if users are supposed to leave badges behind when they go home. However, if users routinely move between buildings, and the network does not cover the outdoor spaces, they might not want to hear an alert tone.
By default, the On/Off Network Alert box is selected, and Override User Settings is set to No.
Low Battery Alert
Low Battery Alert sounds an alert when the battery needs to be recharged.
By default, the Low Battery Alert box is selected, and Override User Settings is set to No.
Text Message Alert
Text Message Alert plays a tone when the user receives a new text message. The tone sounds only once for each new message. An envelope icon also appears on the badge display when the user has unread text messages.
By default, the Text Message Alert box is selected, and Override User Settings is set to No.
Voice Message Alert
Voice Message Alert issues a tone when the user receives a new voice message. The tone plays only once for each new message. A telephone icon also appears on the badge display when the user has unplayed voice messages.
By default, the Voice Message Alert box is selected, and Override User Settings is set to No.
Disable Alerts in DND Mode
Disable Alerts in DND Mode prevents all alert tones when a user puts the badge in Do Not Disturb mode.
By default, the Disable Alert Tones in DND Mode box is not selected, and Override User Settings is set to No.
-
Choose any reminders you want to enable in the Reminders
section:
Setting
Description
Text Message Reminder
Select Text Message Reminder to play a tone on the badge every 15 minutes until a user picks up new text messages.
By default, the Text Message Reminder box is not selected, and Override User Settings is set to No.
Voice Message Reminder
Select Voice Message Reminder to play a tone on the badge every 15 minutes until a user picks up new voice messages.
By default, the Voice Message Reminder box is selected, and Override User Settings is set to No.
DND Reminder
Select DND Reminder to play a tone on the badge every 15 minutes when the badge is in Do Not Disturb mode.
By default, the DND Reminder box is selected, and Override User Settings is set to No.
-
Choose any notifications you want to enable in the Automatic
Notifications section. Automatic notifications allow users to bypass
certain operations without confirming them.
Setting
Description
Missed Call Notification
Missed Call Notification causes the Genie to notify the user of missed calls since the last time the user pressed the Call button. The Genie also announces the names of people who left messages.
Users may prefer to use the "Who called?" command when they are in a quiet area to learn who called. If users are trained to do that, you can clear the Missed Call Notification setting.
By default, the Missed Call Notification box is selected, and Override User Settings is set to No.
Disable Voice Message Notifications
Disable Voice Message Notifications causes the Genie to suppress notifications when a user receives a message. However, the user may still hear a voice message alert tone (if the Voice Message Alert option is selected), and a telephone icon appears on the badge display when the user has unplayed voice messages.
By default, the Disable Voice Message Notifications box is not selected, and Override User Settings is set to No.
-
In the Message Play Settings section, specify the behavior
of the "Play Messages" commands.
Setting
Description
Play Older Messages First
Play Older Messages First causes messages to be played back in the order in which they were received. Urgent messages are always played before non-urgent messages, regardless of this setting.
By default, the Play Messages Oldest First box is not selected, and Override User Settings is set to No.
Play Voice Message Time and Date
Play Voice Message Time and Date causes the playback of each voice message to be preceded by the time and date the message was sent.
If you don't choose this option, users can still hear the date and time a message was sent by pressing the Call button and saying "Date" or "Time" during or just after the play of the message.
By default, the Play Voice Message Time and Date box is selected, and Override User Settings is set to No.
Play Text Message Time and Date
Play Text Message Time and Date causes the playback of each text message to be preceded by the time and date the message was sent.
If you don't choose this option, users can still hear the date and time a message was sent by pressing the Call button and saying "Date" or "Time" during or just after the play of the message.
By default, the Play Text Message Time and Date box is not selected, and Override User Settings is set to No.
-
In the Call Setup section, specify the behavior of the call
setup.
Setting
Description
Fast Call Setup
If you select Fast Call Setup, the call is connected as soon as the recipient accepts it rather than after the call announcement to the caller is finished.
With Fast Call Setup selected, the recipient of a call hears, "Can you talk to [CallerName]?" Meanwhile, the caller hears the name of the recipient. If the call is forwarded to a phone, the caller hears the forwarding announcement before the call is connected.
If you do not select Fast Call Setup, the Genie always completes the call announcement to the caller before connecting the call. If the recipient has a long name, this can cause a brief delay before the call is connected.
By default, the Fast Call Setup box is selected, and Override User Settings is set to No.
Announce Through Speaker
Use the Announce Through Speaker setting to specify the way the badge plays call and message announcements when headsets (or managed lanyards) are used:
Select Announce Through Speaker to play incoming call and message announcements through the badge speaker when a headset is plugged in. If you select this feature, only the announcement plays through the speaker; the actual call or message then plays through the headset.
Clear Announce Through Speaker to play both the announcement and the call or message through the headset.
When a headset is plugged into the badge, all audio plays through the headset by default. Consequently, if users don't wear their headsets all the time, they may not hear an incoming announcement, and they may not know that someone is trying to contact them.
If you select Announce Through Speaker, users can leave their headsets plugged in, and simply put them on to communicate after they hear the announcement. If Announce Through Speaker is turned on and users are wearing their headsets when a call comes in, they may not hear an announcement in a noisy environment (because it plays through the speaker); however, they will still hear the call or message through the headset.
When a headset is not plugged in, all calls, messages, and announcements play through the speaker, as usual, regardless of the Announce Through Speaker setting.
By default, the Announce Through Speaker box is selected, and Override User Settings is set to No.
Press Button to Accept Call
Use the Press Button to Accept Call setting to require users to accept or reject incoming calls by pressing the Call or DND/Hold button. Selecting this feature disables the use of "Yes" and "No" voice commands to accept and reject incoming calls. This feature is useful in certain high-noise environments.
Vocera allows users to accept or reject a call with either voice commands or buttons. In some situations, background noise can cause poor speech recognition, resulting in the Genie repeatedly saying, "I'm sorry, I didn't understand". In other situations, background noise can cause the Genie accept or reject calls without user input prematurely. To avoid these problems, select this box to require users to answer calls using buttons only.
By default, the Press Button to Accept Only box is not selected, and Override User Settings is set to No. Enabling this feature establishes a new system-wide default and may require re-training.
Enable Paging
Enable the Vocera Access Anywhere paging capability.
By default, the Enable Paging box is selected, and Override User Settings is set to No.
Hide Forwarded Number Use the Hide Forwarded Number setting to display the name of the caller instead of an external phone number on the device. By default, the Hide Forwarded Number box is not selected, and Override User Settings is set to No.
-
Specify alert tone settings in the Alert Tones
section:
-
Select one of the following to close the dialog:
- Save — to add the new user to the system.
- Cancel — to return to the All Users page.