User Management tab allows you to import users from an Active Directory server and manage users.
To acess the User Management option:
Navigate to Settings > User Management on the top right corner of the Vocera Analytics Visualization Server.
Manage Users
The Manage User page displays a list of users that are imported. The following screenshot is an example.
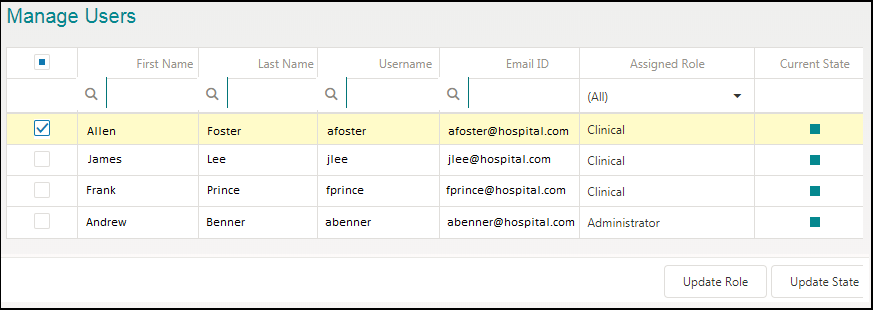
You can use the corresponding Search field to view the details of a user.
| Field | Description |
|---|---|
| Check box | Allows you to select or deselect a user to perform a task. |
| First Name | Displays the first name of the user. |
| Last Name | Displays the last name of the user. |
| User Name | Displays the username of the imported user. |
| Email ID | Displays the email ID of the user. |
| Assigned Role | Displays the role that the user is assigned. Based on the role assigned, the user can perform activities. |
| Current State | Displays the status of the user. A current state are displayed as the
folowing:
|
You can update the role of a user based on the activities they perform. To update role for a user, perform the following tasks:
- Select an user.
- Click Update Role.
The Select Role dialog box is displayed.
- Select one of the roles. For example: Administrator.
- Click Update.
The new role is applied to the user.
You can activate or deactivate a user based on their current state. To update the state of a user, perform the following tasks:
- Select an user.
- Click Update State.
The Select State dialog box is displayed.
- Select one of the options. For example: Deactivate.
- Click Update.
The user is deactivated.
Note: By default, an user is active.
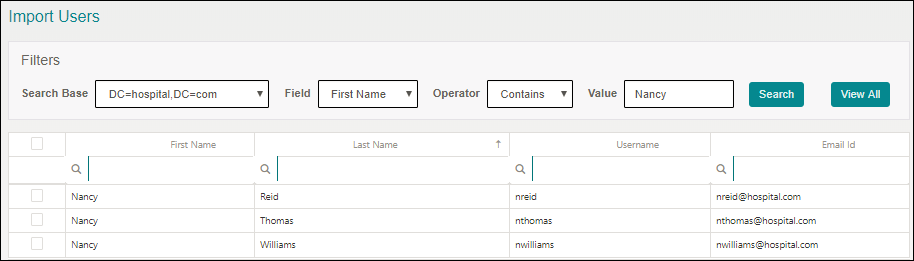
Import Users
You can import users from an Active Directory server into Vocera Analytics. Importing users allow you to manage users, list users, assign a role to each user, and activate or deactivate a user.
To import a user, perform the following tasks:
- Select an option from the Search Base dropdown. A Search
Base filter specifies the base distinguished names. For example,
DC=hospital,DC=com. Note: The available options are based on your base distinguished names set for your organization.
- Select an option from the Field dropdown. A
Field filter specifies the options available to search. For example,
First Name. The options available are:
- First Name
- Last Name
- User Name
- Email ID
- Title
- Depatment
- Group
- Select an option from the Operator dropdown. The
Operator filter specifies the action to be used based on the search
criteria. For example, Contains. The options available are:
- Contains
- =
- !=
- Enter a value in the Value field. The Value field specifies the keyword related to the filters that you have selected. For example, nancy.
- Click Search.
The search result is displayed based on the Search Base, Field, Operator, and Value selected.