The Vocera Analytics installation application provides you the capability to run the Data Migration for Engage Analytics process.
Configuring db_migrate.conf
To configure the Engage Analytics migration source and target for db_migrate, perform the following tasks:
-
Provide the URL, username, and password for the source and destination,
replacing the placeholders in the file that are enclosed in angle brackets.
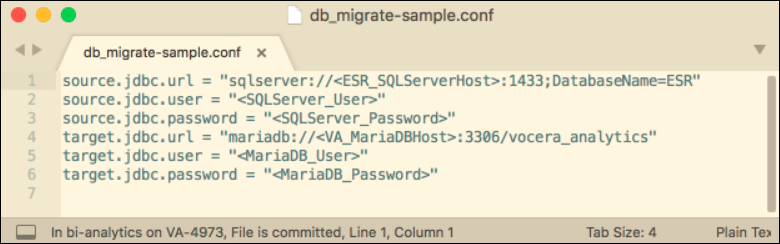
Note: Do not include angle brackets around the values, but ensure the values are enclosed in double quotes.The following screenshot displays the sample db_migrate.conf file.
 Note: All strings must be enclosed in double quotes. If backslash or double quotes are used in a string, it must be properly addressed. Failure to follow these instructions will lead to an error and failed migration if the string contains a special character (as often required by password policy), a backslash, or a double quote.
Configuring db_run.conf
To configure the Engage Analytics migration source and target for db_run.conf, perform the following tasks:
-
Provide the URL, username, and password for the source and destination,
replacing the placeholders in the file that are enclosed in angle brackets.
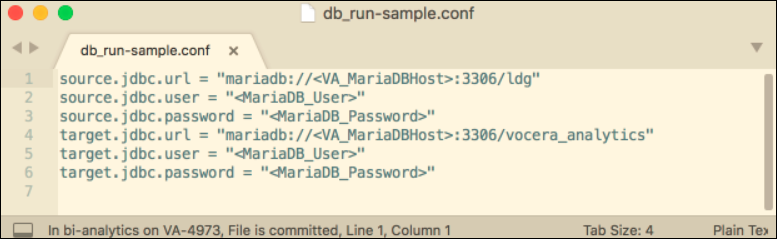
Note: Do not include angle brackets around the values, but ensure the values are enclosed in double quotes.The following screenshot displays the sample db_run file.
 Note: All string values (on the right side of the equals sign) must be enclosed in double quotes. If a backslash or double quotes occurs in a string value, it must be escaped with a backslash.
For example, the string "\\\"" in a configuration file would produce a single backslash and a double quote. Failure to follow these instructions will result in an error and failed migration if the string contains a special character (as often required by password policy), a backslash, or a double quote.
Executing the migrate.cmd Windows Batch File
To execute the Data Migration process, perform the following tasks:
-
Open a command prompt window (cmd.exe) and change the
current directory to the DataMigration directory in the
Vocera Analytics installation directory.
The following screenshot shows the DataMigration directory in command prompt:
