The basic requirements to federate are met by setting up hostnames in DNS and adding the Vocera XMPP Adapter certificate to the Cisco Unified Communications Manager IM and Presence server.
The Cisco Unified Communications Manager IM and Presence platform facilitates the secure exchange of presence and instant messaging (IM) information between Cisco Unified Communications Manager and the Vocera XMPP Adapter.
Register Hostnames in DNS
The domains listed on this page use mydomain.com to represent the XMPP server domain.
The following domains must be registered in DNS for federation between servers.
A record for:
- mydomain.com
- chat.mydomain.com
- extension.mydomain.com
The following hostnames should be registered in DNS.
SRV records for:
_xmpp-server._tcp.mydomain.com 0 0 5269 mydomain.com.
_xmpp-server._tcp.chat.mydomain.com 0 0 5269 mydomain.com.
_xmpp-server._tcp.extension.mydomain.com 0 0 5269 mydomain.com.
_xmpp-client._tcp.mydomain.com 0 0 5222 mydomain.com.
_xmpp-client._tcp.chat.mydomain.com 0 0 5222 mydomain.com.
_xmpp-client._tcp.extension.mydomain.com 0 0 5222 mydomain.com.
Upload the XMPP Certificate to the Cisco Unified Communications Manager IM and Presence Server
The Vocera XMPP Adapter generates a self-signed security certificate required to communicate with it, which specifies the XMPP server domain. The certificate must then be uploaded to the Cisco Unified Communications Manager IM and Presence for the server to trust the Vocera XMPP Adapter and allow federation.
Once the certificate is generated and downloaded as described in Federating the Servers, then the certificate must be uploaded to Certificate Management in the Presence OS Administration on the Cisco Unified Communications Manager IM and Presence server. If a certificate later has to be re-generated, replace the XMPP certificate on the Cisco Unified Communications Manager IM and Presence server and restart the Cisco Unified Communications Manager IM and Presence service and the Federation services.
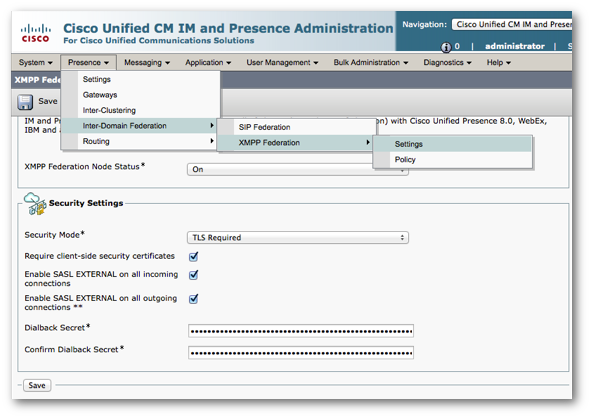
Set Security in Cisco Unified CM IM and Presence Administration
Navigate to Unified CM IM and Presence Administration and log in with credentials provided by a System Administrator.

Navigate the following path, as shown below: Presence > Inter-Domain Federation > XMPP Federation > Settings. Ensure the following are enabled in Security Settings:
- Security Mode: TLS Required
- Require client-side security certificates
- Enable SASL EXTERNAL on all incoming connections
- Enable SASL EXTERNAL on all outgoing connections
- Dialback Secrets are needed when there is a certificate issue. Vocera Platform and Cisco Unified Communications Manager IM and Presence will prefer SASL security. See Upload Certificate in Cisco Unified Communications Manager IM and Presence Operating System Administration below.
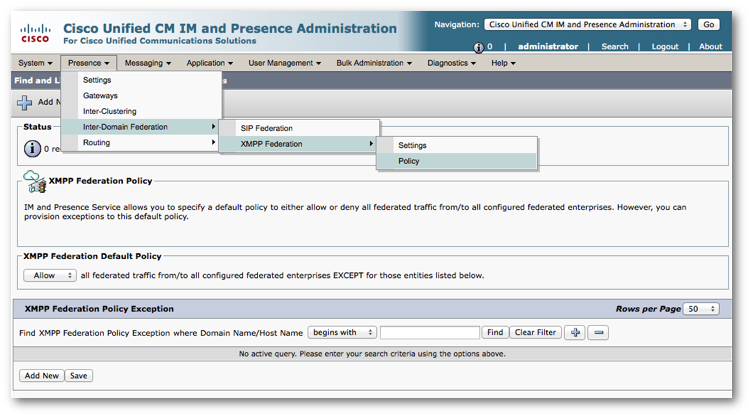
Navigate the following path, as shown below: Presence > Inter-Domain Federation > XMPP Federation > Policy. Ensure the XMPP Federation Default Policy is set to Allow. If the XMPP Federation Policy is set to Deny, then ensure the Vocera Platform hostname is listed in the XMPP Federation Policy Exception field.
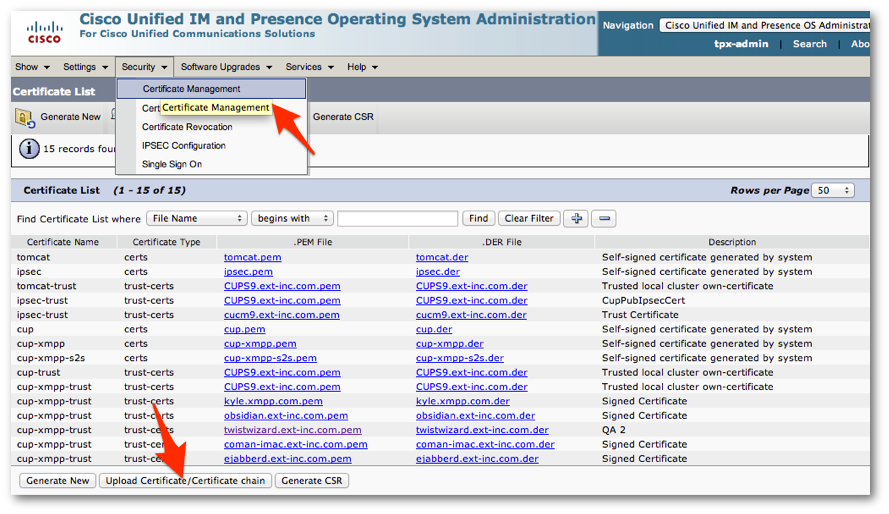
Upload Certificate in Cisco Unified IM and Presence Operating System Administration
Navigate to Cisco Unified IM and Presence Operating System Administration on the Cisco Unified Communications Manager IM and Presence server and log in with the credentials provided by a System Administrator.

Select Security > Certificate Management in the menu bar, as shown below. Use Find to view existing certificates. Select Upload Certificate/Certificate Chain and upload the XMPP self-signed certificate. If a certificate already exists for the host, you must remove it. See Replace an Existing XMPP Certificate on the Cisco Unified Communications Manager IM and Presence Server below.
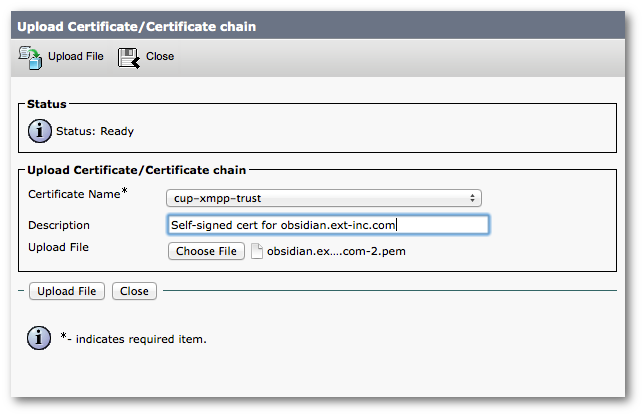
Select cup-xmpp-trust in the Certificate Name drop-down list and enter a meaningful identification statement in the Description field. Select Choose File and navigate to the .pem certificate file downloaded from the Vocera XMPP Adapter. Click Upload File to load the XMPP certificate to the Cisco Unified Communications Manager IM and Presence server.
Replace an Existing XMPP Certificate on the Cisco Unified Communications Manager IM and Presence Server
Under some circumstances the Vocera XMPP Adapter will generate a new certificate, and the old certificate will no longer work. This may happen if the domain name changes, for example.
Select the old certificate and delete it, then generate and upload a new certificate using the steps above.
2013-10-09 10:47:29,473 [pool-40-thread-2] INFO : error caught on transportation layer
javax.net.ssl.SSLHandshakeException: SSL handshake failed.
at org.apache.mina.filter.ssl.SslFilter.messageReceived(SslFilter.java:487)
at org.apache.mina.core.filterchain.DefaultIoFilterChain.callNextMessageReceived(DefaultIoFilterChain.java:417)
at org.apache.mina.core.filterchain.DefaultIoFilterChain.access$1200(DefaultIoFilterChain.java:47)
at org.apache.mina.core.filterchain.DefaultIoFilterChain$EntryImpl$1.messageReceived(DefaultIoFilterChain.java:765)
at org.apache.mina.core.filterchain.IoFilterAdapter.messageReceived(IoFilterAdapter.java:109)
at org.apache.mina.core.filterchain.DefaultIoFilterChain.callNextMessageReceived(DefaultIoFilterChain.java:417)
at org.apache.mina.core.filterchain.DefaultIoFilterChain.fireMessageReceived(DefaultIoFilterChain.java:410)
at org.apache.mina.core.polling.AbstractPollingIoProcessor.read(AbstractPollingIoProcessor.java:710)
at org.apache.mina.core.polling.AbstractPollingIoProcessor.process(AbstractPollingIoProcessor.java:664)
at org.apache.mina.core.polling.AbstractPollingIoProcessor.process(AbstractPollingIoProcessor.java:653)
at org.apache.mina.core.polling.AbstractPollingIoProcessor.access$600(AbstractPollingIoProcessor.java:67)
at org.apache.mina.core.polling.AbstractPollingIoProcessor$Processor.run(AbstractPollingIoProcessor.java:1124)
at org.apache.mina.util.NamePreservingRunnable.run(NamePreservingRunnable.java:64)
at java.util.concurrent.ThreadPoolExecutor$Worker.runTask(ThreadPoolExecutor.java:886)
at java.util.concurrent.ThreadPoolExecutor$Worker.run(ThreadPoolExecutor.java:908)
at java.lang.Thread.run(Thread.java:662)
Caused by: javax.net.ssl.SSLException: Received fatal alert: unknown_ca
at com.sun.net.ssl.internal.ssl.Alerts.getSSLException(Alerts.java:190)
at com.sun.net.ssl.internal.ssl.SSLEngineImpl.fatal(SSLEngineImpl.java:1429)
at com.sun.net.ssl.internal.ssl.SSLEngineImpl.fatal(SSLEngineImpl.java:1397)
at com.sun.net.ssl.internal.ssl.SSLEngineImpl.recvAlert(SSLEngineImpl.java:1563)
at com.sun.net.ssl.internal.ssl.SSLEngineImpl.readRecord(SSLEngineImpl.java:1023)
at com.sun.net.ssl.internal.ssl.SSLEngineImpl.readNetRecord(SSLEngineImpl.java:837)
at com.sun.net.ssl.internal.ssl.SSLEngineImpl.unwrap(SSLEngineImpl.java:713)
at javax.net.ssl.SSLEngine.unwrap(SSLEngine.java:607)
at org.apache.mina.filter.ssl.SslHandler.unwrap(SslHandler.java:728)
at org.apache.mina.filter.ssl.SslHandler.unwrapHandshake(SslHandler.java:666)
at org.apache.mina.filter.ssl.SslHandler.handshake(SslHandler.java:552)
at org.apache.mina.filter.ssl.SslHandler.messageReceived(SslHandler.java:351)
at org.apache.mina.filter.ssl.SslFilter.messageReceived(SslFilter.java:468)
Restart the Presence Services
Restart the presence services when a new certificate has been uploaded, but the domain name does not change.
Log into Cisco Unified IM and Presence Serviceability on the Cisco Unified Communications Manager IM and Presence server, as shown below. Select Tools > Control Center - Feature Services in the menu bar. Then, restart the Cisco Presence Engine and the Cisco XCP XMPP Federation Connection Manager services.
