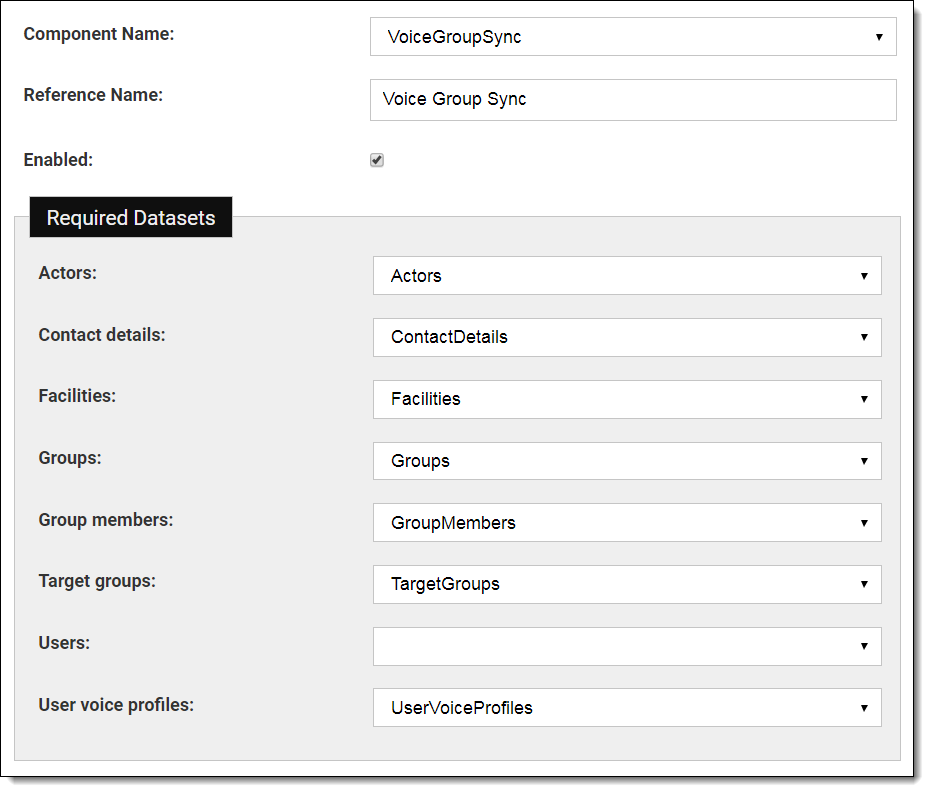
These settings enable direct communication between the Vocera Voice Group Sync Adapter and the Vocera Platform.
Select an empty field and begin typing, or select an existing value and type over it. To keep an existing value, do not edit that field.
-
Navigate to the New Adapter option, or navigate to an existing adapter to edit.
See Creating a New Adapter and Editing an Adapter for instruction as needed.
The configuration fields are the same for new and existing adapters.
-
Complete the Server Settings configuration fields as
described in the table.

Server Settings Description Server Addresses Enter the unique IP address for the customer's Vocera Voice Server.
If multiple servers are used, each address must be on a separate line.
Use standard IP address format (xxx.xxx.xxx.xxx, where each xxx is a number from 0-255), or use standard FQDN format, such as smtp.gmail.com.
The server address must match the common name on the SSL certification installed on the Voice Server. When using SSL, the server address should be the hostname; not the IP address which is typically used.
SSL certificates may be signed by trusted certificate authorities or be self-signed. If signed by a trusted authority, then no action is required. If self-signed, then the certificates must be imported. First download the SSL certificate, then navigate to Security > Certificates, and Upload the certificate. Once the certificates are uploaded, restart Glassfish to make the certificates available to the adapter.
Use SSL Select the Use SSL checkbox to enable the adapter to connect to the Vocera Voice Server using HTTP over SSL protocol. By default, https port 443 is used for this connection.
Login Enter the login name for the Administrator account used to access information on the Voice Server.
These login fields allow the Vocera Platform authentication to interact with the Vocera Server(s) indicated on this page in the Server Addresses field.
Password Enter the password for the Administrator account used to access information on the Voice Server.
These login fields allow the Vocera Platform authentication to interact with the Vocera Server(s) indicated on this page in the Server Addresses field.
Import Interval Enter the number of hours between successive imports of users and groups from the Voice Server. The range is 0 to 168 hours. Setting the value to zero will prevent automatic importing.
Sites Enter the names of the sites for which you wish to sychronize the user and group lists between Vocera Platform and the Vocera Voice Server. When this field is empty, users and groups in all sites are synchronized.
Global is a Vocera Voice Server default site that contains a defined list. If global users and groups should be synchronized between Vocera Platform and the Voice Server, be sure that 'Global' is included in this Site field
-
Complete the Group Sources of Truth configuration fields
as described in the table.
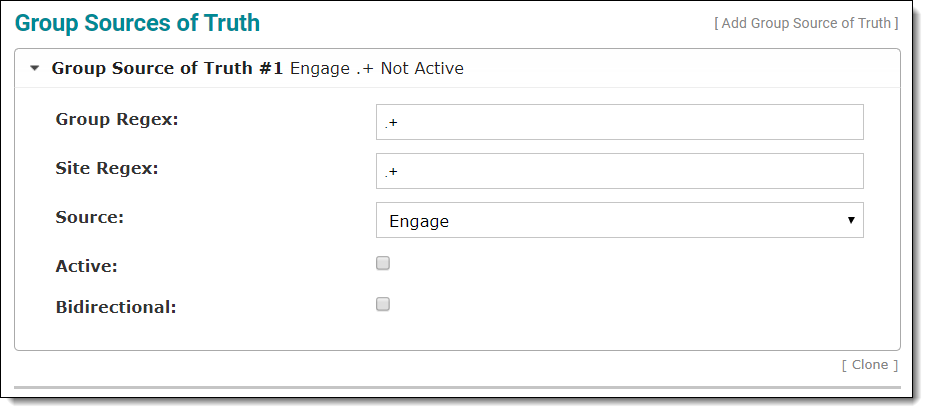
Using the fields in this configuration section, the System Administrator will define which groups are synchronized, and if the Voice Server or Engage Server is the source (Source of Truth).
All groups and memberships of those groups are read from the Voice Server and from the Engage Server. The Name attribute from the Engage group is matched to the Site and Group Name of the Voice Server group, then the membership of the groups are adjusted.
Based upon the configuration, either the Engage Server or the Voice Server can be the source, and the other server is considered the copy. Upon synchronization, users are mapped by login/user ID, and any users that exist in a source group, but are not present in the corresponding copy group, are added to the copy group. Any users that are not in the source group, but are present in the corresponding copy group, are removed from the copy group. If the user is unknown to the copy group, then the membership of the copy group is not changed.
There must be at least one Group Source of Truth defined, though it may be inactive. Multiple Source of Truth definitions are processed sequentially. For example, the first Source of Truth may be specifically defined, and a second Source of Truth may catch all other matches.
The Group Source of Truth definitions are numbered and can be re-ordered in the list. Click on an item, and drag and drop to reorganize as needed; the numbering is automatically reassigned by the system.
Group Sources of Truth Description Group Regex Enter a regular expression that will be matched to the Group Name attribute on the Groups dataset.
Enter a wildcard (.+) to synchronize all groups.
If two Group Source of Truth definitions are defined with the same Regex, the configuration cannot be saved.
Site Regex Enter a regular expression that will be matched to the Site Name attribute on the Groups dataset.
Enter a wildcard (.+) to synchronize all groups.
If two Group Source of Truth definitions are defined with the same Regex, the configuration cannot be saved.
Source Click the down arrow in the Source field and select an option from the dropdown list.
Options are Voice Server, or Engage.
This choice allows you to specify whether Engage or the Voice Server is the source of truth for the group when synchronizing data across the two systems.
When the Voice Server is the source of truth, the groups in Engage will be updated with data from the Voice Server.
When Engage is the source of truth, group changes in Engage will be pushed to the Voice Server.
Active Check this box to enable or disable the Group Source of Truth defined on the system.
If there is no active Group Source of Truth, the groups will be not be synchronized.
Bidirectional Check this box to enable or disable bidirectional synchronization.
When bidirectional is enabled for a group source, group member's changes will be published and processed regardless of Source of Truth. Source of Truth is still utilized during initial startup and synchronization to resolve inconsistent data.
When bidirectional is disabled, then group membership changes will only be published by or processed from the Source of Truth.
Add Group Source of Truth Click Add Group Source of Truth to add a new Group Source of Truth at the bottom of the list.
A new Group of Source of Truth will be added below the existing Group Source of Truth. Click on a Group Source of Truth, and then drag and drop to re-order the list as needed.
Clone Click Clone to copy an existing Group Source of Truth.
A new item will display at the bottom of the list, assigned the next sequential number, ready to be configured.
Remove Click Remove to delete an existing Group Source to Truth.
The item is immediately removed, and the list is automatically re-numbered.