It may be necessary to configure a serial device, such as a Digibox, to enable communication between the Vocera Platform, and an external system that sends data to or receives data from the Vocera Platform. The serial device is used to convert serial asynchronous data from an RS232 port to TCP/IP packets.
For the Vocera TAP Adapter to communicate with the third-party system, the login credentials described in this document must be the same in both the serial device and the Engine configurations. The Digibox example described in this section uses the fictitious IP address 10.42.22.134; contact a system administrator for the IP address needed for an actual installation.
Use a serial device, such as a Digibox, to connect with TAP-capable systems in the following scenarios:
- If the serial device is not in close proximity to the Vocera Platform Appliance
- If multiple serial connections are needed
- If the Vocera Platform is running on a Virtual Machine
The following constraints apply to the serial device used with the Vocera Platform:
- Any serial device must be connected to the same subnet that the system is on.
- Both single port and dual port serial devices are supported. A dual port serial device is required for receiving and forwarding message data. A single port serial device can be used if TAP messages are not forwarded to another system.
Follow the instructions included with the serial device. These instruct on the basic installation and setup of the device, as well as the IP address setup and other needed information at the end of the setup wizard. The following instructions are specific to the Digibox serial device.
Connect to the Network
Plug the Digibox serial device into the DHCP network. The Ethernet cable connected to the DHCP switch plugs into the Ethernet port on the Digibox.
Plug in the Digibox serial device's power cord. The Digibox has four lights: green and yellow lights next to the Ethernet port, and green and yellow lights next to the Power port. The Digibox is connected to the network once both green lights are solid (not blinking) and the Ethernet yellow light is blinking/flickering (indicating network traffic).
Login to the Digibox Serial Device
Once the Digibox is connected to the network, use the DigiDiscovery / DigiPortAuthority software (Windows OS) to scan for the Digibox. One entry should appear.
Select the Digibox in the PortAuthority window and select Configure. An authentication window displays; type root in the User Name field, and dbps in the Password field. Select OK to log in, or Cancel to exit the Digibox authentication window.

Alternatively, if provided by the installation team, access the local IP Address in a web browser. Type root in the User Name field, and dbps in the Password field. Select Log In to log into the Digibox, or Cancel to exit the Digibox authentication window.

Configure Digibox Settings
Once logged into the Digibox, configure the settings as follows.
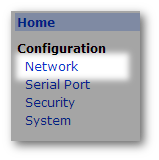
Select Serial Port in the Configuration section of the Configuration window.

Select the Port 1 link in the Serial Port Configuration window.

Select Change Profile in the Port Profile section.

Select the radio button next to TCP Sockets in the Select Port Profile window to change from the default RealPort setting to TCP/IP.

By default, the serial device is set as a server and the Vocera TAP Adapter as a client. If you wish to set the serial device as the client (and the Vocera TAP Adapter as the server) then select the TCP Client option to automatically establish TCP connections and provide the IP Address of the Vocera Platform Appliance.

Scroll down and select Apply, or select Cancel to return to the Serial Port Configuration page.

Select Return to Serial Ports in the menu bar of the Serial Port Configuration page.

Select Network in the Configuration section of the left-hand side menu.
Select the radio button next to Use the following IP address and enter the static IP address of the Digibox. By default, the device should be set to "Obtain an IP address automatically using DHCP".

Scroll down to verify settings and select Apply.

A pop-up message appears stating that the Digibox must be restarted before the network settings will be applied. To do this, select Reboot in the popup message, or select the Reboot link at the bottom of the left-hand side menu as shown below.

Connect to the System
Plug the crossover serial cable into the sending system, and the other end of the cable into the serial port of the Digibox.