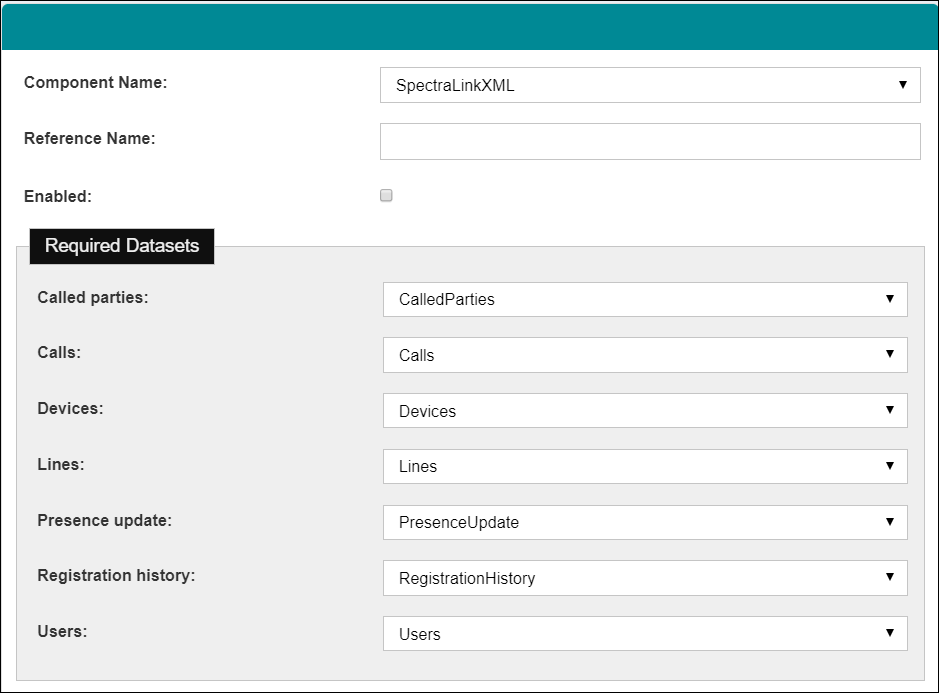
These settings enable direct communication between the Vocera SpectraLink XML Adapter and the Vocera Platform.
Select an empty field and begin typing, or select an existing value and type over it. To keep an existing value, do not edit that field.
-
Navigate to the New Adapter option, or navigate to an existing adapter to edit.
See Creating a New Adapter and Editing an Adapter for instruction as needed.
The configuration fields are the same for new and existing adapters.
-
Complete the Common Settings configuration fields as
described in the table.

Common Settings Configuration Field Description Admin User Name Insert the Administrator's User Name that is applicable to all SpectraLink devices into this field. Admin Password Insert the Administrator's Password that is used in conjunction with the Admin UserName. The password field displays asterisks, and not the user's entry. Associate Users Select the Associate Users checkbox if you are using the SpectraLink User Profile feature.
If you are managing user to phone number associations in Vocera Platform, do not select this option.
Default User Select a user name in the Default User drop down list to assign that user to be the default for the Vocera SpectraLink XML Adapter. The user names displayed in the list are non-system users who are Active and are not authenticated by LDAP. Warning: A default user MUST be set. If a default user is not defined, the user is forced to re-authenticate after every session timeout. This may cause a user to miss notifications.Heartbeat Interval Enter a time, in seconds, in this field. The Vocera SpectraLink XML Adapter will use this value to determine if a device's heartbeat has been missed. Maximun Concurrent Messages Enter the maximum number of messages that will be sent concurrently to phones. -
Complete the PTT Settings configuration fields to configure the Push-To-Talk
functionality.
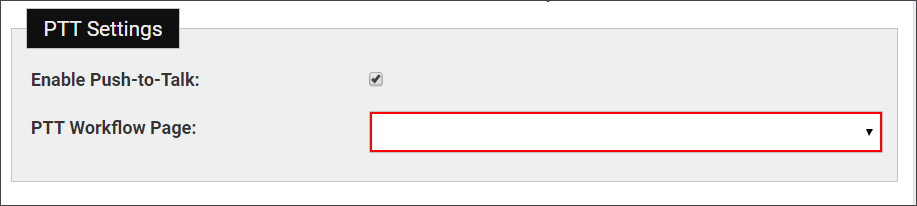
PTT Settings Description Enable Push-To-Talk Select the Enable Push-to-Talk checkbox to enable this feature on devices that support this functionality. Selecting this option displays the PTT workflow page selection field. PTT Workflow Page Select a workflow from the drop down list. The selected workflow page will allow a user to utilize the Push-To-Talk functionality from that workflow page. -
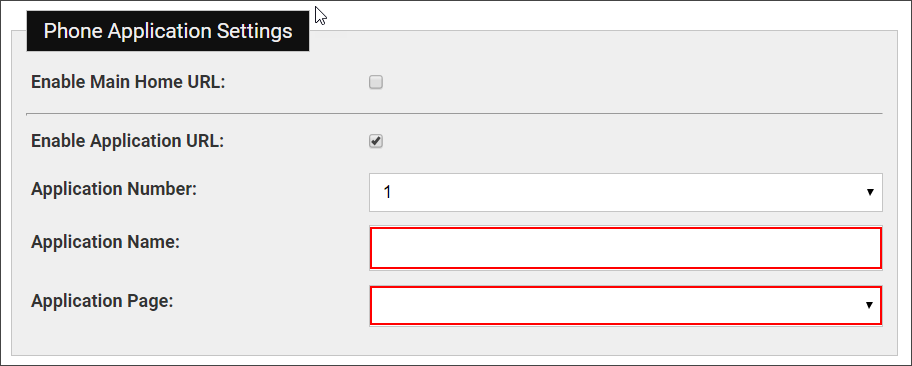
Complete the Phone Application Settings configuration
fields as described in the table.
The settings described in this section provide the Vocera Platform with the explicit information required to communicate with the customer's devices, such as setting a default workflow page for the home screen or an outside application for a user profile. Enter these values exactly as provided.
Select Enable Main Home URL to use a Vocera Platform workflow page as the default home screen on all devices. Otherwise, select Enable Application URL to utilize a URL other than a Vocera Platform workflow page. The configuration for these choices is described in the following table.
Phone Application Settings Description Enable Main Home URL Select Enable Main Home URL if a Vocera Platform workflow page will be the default home screen on all devices.
Selecting this checkbox displays an additional configuration field; Main Home Page.
Main Home Page Select the workflow to be used as the default home screen from the drop down menu in Main Home Page. Enable Application URL Select Enable Application URL if the facility is using a URL other than an Vocera Platform workflow page for the default home page.
Selecting this checkbox displays additional configuration fields.
Application Number Assign an Application Number to the URL. You may assign a number between 1-6 from the dropdown menu. This will allow you to change Applications at a later date easily. Application Name Enter the name of the Application in this field. Application Page Select the workflow page that will be used as the URL for the Application page.