These settings enable direct communication between the Vocera Patient Context Adapter and the Vocera Platform.
Select an empty field and begin typing, or select an existing value and type over it. To keep an existing value, do not edit that field.
-
Access the Vocera Platform Web Console and navigate to the adapters.
See Navigating the Vocera Platform Adapters for instructions.
-
Navigate to the New Adapter option, or navigate to an existing adapter to edit.
See Creating a New Adapter and Editing an Adapter for instruction as needed.
The configuration fields are the same for new and existing adapters.
-
Complete the configuration fields as described in the table.
This section explains the settings that enable direct communication between the adapter and the Vocera Platform. Complete the fields described below to configure an adapter with the appropriate information to perform as required.
Select an empty field and begin typing, or select an existing value and type over it. To keep existing values, do not edit that field.
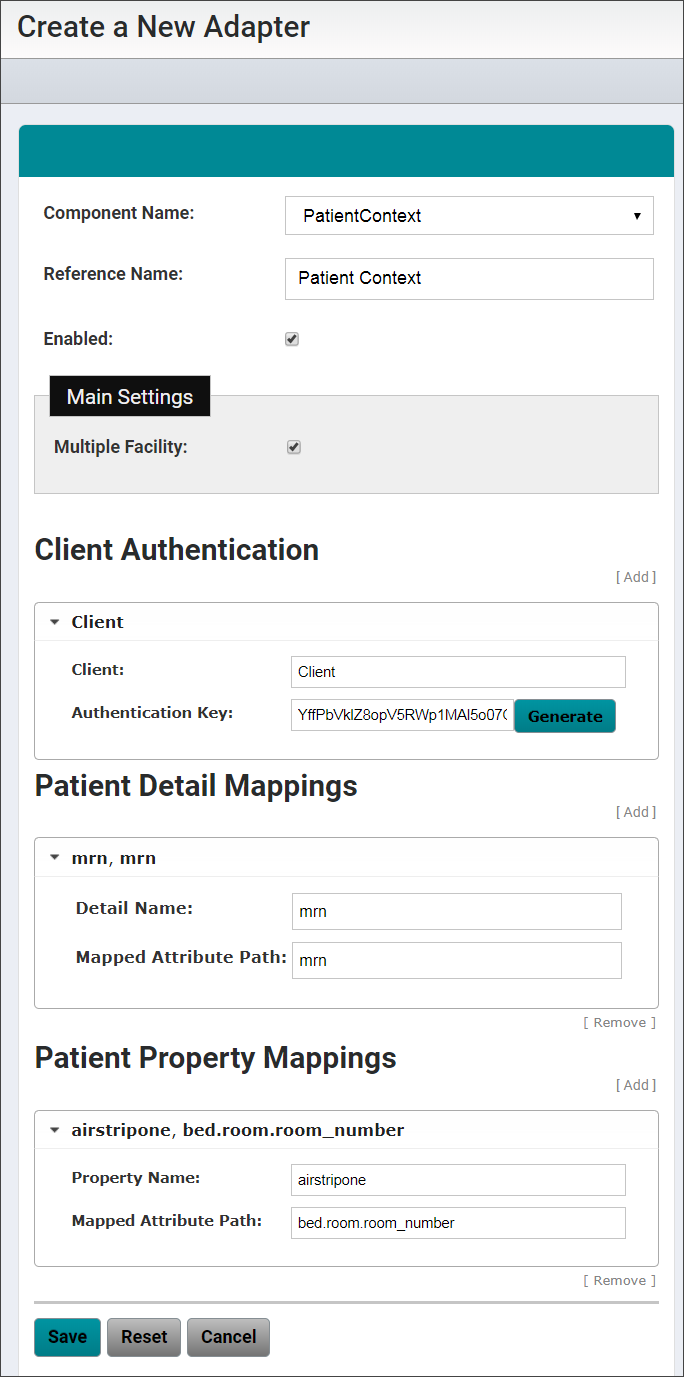
Configuration Field Description Component Name Click the Component Name field to display a list of the systems and devices that the Vocera Platform currently supports. Select the name of the adapter to create. Reference Name Enter a short descriptive name in the Reference Name field to uniquely identify an adapter instance. It may demonstrate the adapter function or other information; for example, Production adapter may differentiate a live adapter from a development or "sandbox" adapter. Enabled Select the Enabled checkbox to allow the Vocera Platform to use the new adapter. The Vocera Platform ignores the adapter if this option is disabled. Required Datasets If more than one dataset exists that meets the adapter's requirements, select the appropriate datasets for the new adapter to function correctly. The system searches for the datasets that meet the adapters requirements. If the datasets already exist, the system will use them. If the datasets do not exist, the system will create them automatically.
Select Create in the drop-down menu to create a new dataset to meet the organization's requirements.
-
Complete the Main Settings configuration fields as
described in the table.
Main Settings Description Multiple Facility Check the Multiple Facility box to prepend the Unit name with the facility name when the customer has multiple facilities or sites.
When checked, patient search results and assigned patient lists will display the facility name with the unit name appended.
-
Complete the Client Authentication configuration fields
as described in the table.
These settings allow Vocera to verify the authenticity of the client using the JSON Web Token (JWT) protocol. JWT is used for creating asset tokens that assert some number of claims. JWT claims can be typically used to pass identity of authenticated users between an identity provider and a service provider. The tokens are signed by the server's key, so the client and server are both able to verify that the token is legitimate.
The Vocera Patient Context Adapter authentication is via JWT from the HTTP Authorization header, using the Bearer type. The token must have one of the configured client identifiers as the issuer value, a valid expiration time, a subject claim, and a valid signature based on the given issuer's authentication key.
The subject key is assumed to be the login of the user initiating the request, and it is used for compliance logging for each patient returned by the service (search results, a caregiver's patient list, or patient details).
Client Authentication Description Client Enter the service's client (using their JWT issuer claim value) to identify this client for authentication. This Client setting must be unique across all records.
Authentication Key Click Generate to automatically generate the shared key this client will use for authentication.
This value is used for HMAC-SHA256 signing of the client's JWT tokens, and must be at least 256 bits (32 bytes) in URL safe base 64 encoding.
The generated key displays in the Authentication Key field, and a confirmation message displays above the settings.
-
Complete the Patient Detail Mappings configuration
fields as described in the table.
The Patient Detail Mappings fields define the values to be displayed for the patient details. All fields are required.
Create an ordered list of Patient Detail mappings by clicking Add to create a mapping, or Remove to delete a mapping. Re-order the list of mappings by clicking to select a mapping, and then drag and drop it in a different order.
Patient Detail Mappings Description Detail Name Enter the name to identify a specific patient value. This must be unique within the patient details. Mapped Attribute Path Enter the dataset path expression used to map to the patient detail name in the mapping. The path is relative to the Patients dataset. -
Complete the Patient Property Mappings configuration
fields as described in the table.
The Patient Property Mappings fields specify the keys and values to be included in the patient details as system properties to support processing, such as integrations. All fields are required.
Create an ordered list of Patient Property mappings by clicking Add to create a mapping, or Remove to delete a mapping. Re-order the list of mappings by clicking to select a mapping, and then drag and drop it in a different order.
Patient Property Mappings Description Property Name Enter a key name identifying the system property. This must be unique within the patient properties.
Mapped Attribute Path Enter the dataset path expression to use to map to the value of the system property name. The path is relative to the Patients dataset. - Select one of the available options to exit the adapter configuration page. See Saving an Adapter for details.