The following instructions provide information on the MS Graph API integration feature available in the Incoming Email adapter version 1.18.0 and how to set up the permissions necessary for a successful API connection.
Microsoft Graph is the gateway to data and intelligence in Microsoft 365 products. For facilities that use 365, the MS Graph API is the key to accessing this gateway and the Incoming Email adapter allows for this integration. This version gives the option of configuring the adapter to integrate with MS Graph by adding a new Inbox Setting for the gateway and entering the necessary cloud and client information.
For detailed instructions please see Configuring A Vocera Incoming Email adapter..
To set up a connection with the Azure portal and Microsoft Graph API, first add an Inbox Setting to the Adapter configuration. Below is an example of an MS Graph Inbox setting and the required fields.
Enter a Reference Name to uniquely signify the type of incoming email facilitated by the adapter. Make sure the Inbox Setting is enabled as Active, and the Protocol is set to 'MSGRAPH'.
When selecting the National Cloud, use the following link to specify the type of Microsoft cloud services being used in the deployment. The preselected drop down option is 'GLOBAL', but depending on the facility may use other services like 'USGOVERNMENT', 'CHINA', or 'GERMANY'. Work with your facility and see https://docs.microsoft.com/en-us/graph/deploymentsto determine which national cloud your application belongs to.
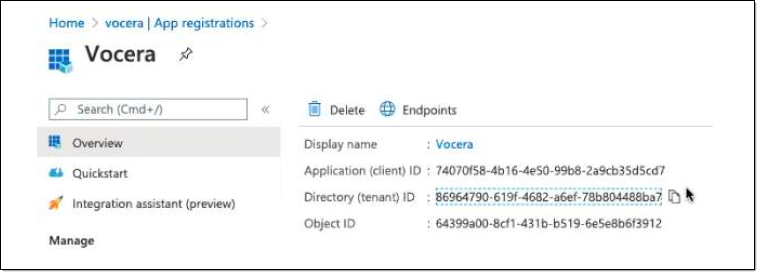
The Client ID and Tenant ID specifies the application ID's assigned by the application registration portal. This is unique to Microsoft Graph and requires registering Vocera as a valid application through the facility's Azure portal. For additional information on setting up an Azure account, please see https://docs.microsoft.com/en-us/azure/active-directory/develop/quickstart-register-app.
Once Vocera is a registered application a client and tenant ID are associated with the platform and should be entered in the Inbox Setting of the adapter for Microsoft Graph. An example of a registered Vocera application is below. Selecting the Vocera application after registration shows the IDs needed to copy into the adapter interface.
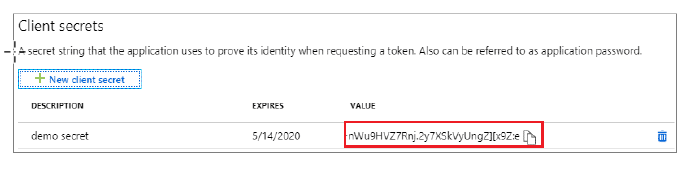
The Client Secret is another value that is generated via the Azure portal. Please see Microsoft's instructions for setting up a Client Secret. Once a Client Secret, (a secret string that will authenticate Vocera with Azure), is created, enter the value in the Incoming Email adapter. An example of a created Client Secret in Azure is below.
The User and Password fields are the login credential used for accessing emails. Enter the username and password information of the email address the facility uses to receive incoming email.
The Retrieve Interval, similar to the polling interval field of other adapters, is the field where the length of time is specified (in seconds) between checks for new email activity. The default value is 30 seconds, but can be specified anywhere between 15 and 90 seconds.
The Acceptable Recipient and Acceptable Senders Fields are the only two fields not required for a Microsoft Graph integration, but can specify which recipients and senders are permitted within Vocera. If nothing is specified, the configuration will allow all recipients and senders.
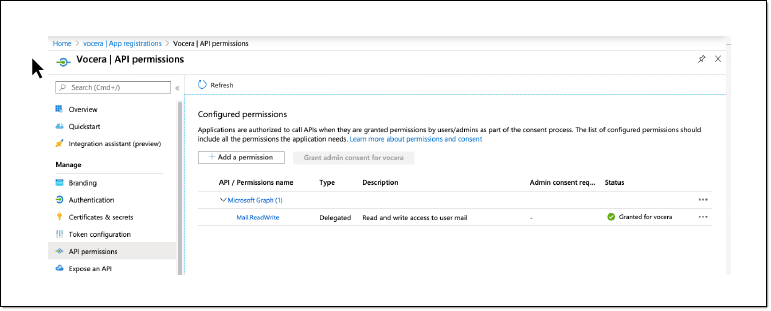
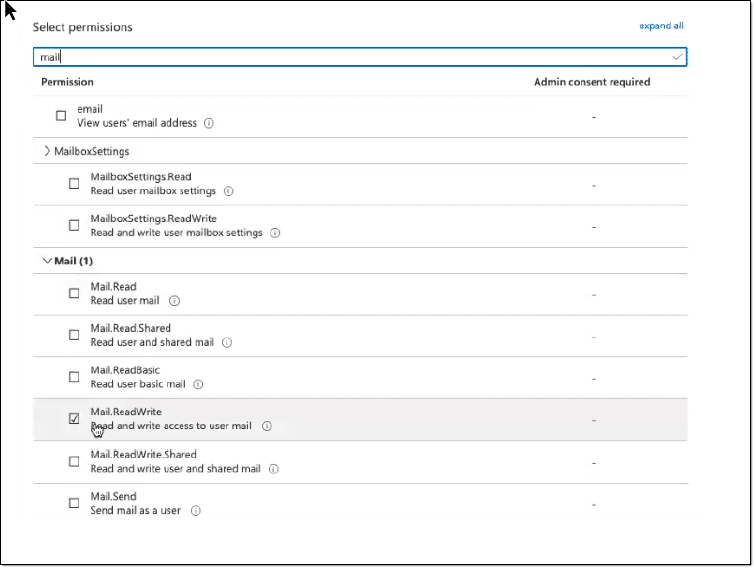
To read and delete after storing emails, an API permission needs to be added for accessibility through the Azure portal to read and write the email to the Vocera platform. After registering Vocera in Azure, add a 'Mail.ReadWrite' API permission within the Vocera application. An example is shown below.
Select the API Permissions tab on the left side of the menu, then select Add a Permission.
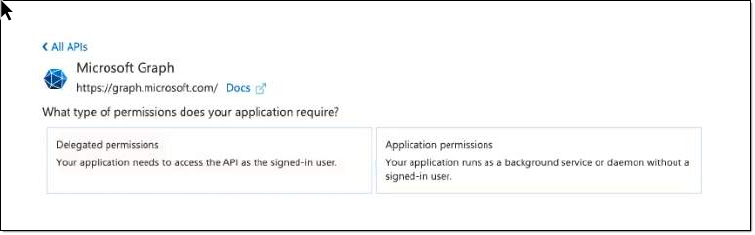
When adding a permission select Microsoft Graph at the top of the Commonly used Microsoft APIs section as shown below.

Select Delegated permissions. This allows Microsoft Graph to sign into the facility's instance of Vocera.
Next, you will see a list of available permissions that can be enabled. Select Mail.ReadWrite checkbox. You can use the search bar at the top to narrow down your choices by typing in Mail.
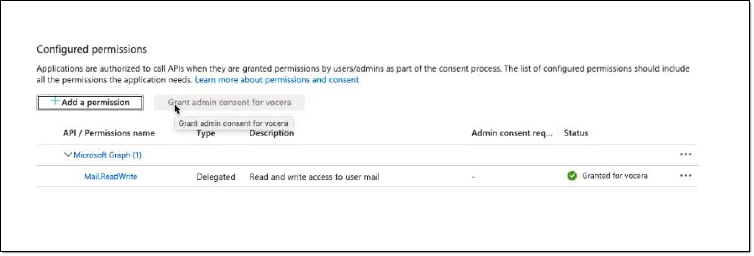
Go back to the list of Configured Permissions in the API Permissions tab. Select Grant Admin Consent for Vocera. This will give Vocera the proper administrative rights as an application when accessing Microsoft Graph and Incoming Emails. A green check mark will appear to confirm the Mail.ReadWrite permission is properly configured for the facility.
This concludes the steps for configuring Azure to work with the Incoming Email adapter.